-svg (3)")
Salesforce AWS Integration Abstract
In its nearly about 20 years of existence, Salesforce has gone through a lot of modifications but it has not veered off from its mission of being the leader in CRM (Customer Relationship Management) market, the definition of CRM has changed drastically over the two decades, from being a management automation tool to expanding its wings in customer service and marketing automation, then moved into B2B, B2C and B2B2C e-commerce.
On the other hand, Amazon web service (AWS) is the market leader of IaaS (Infrastructure-as-a-service) and PaaS (Platform-as-a-Service), AWS provides a broad set of cloud-based services including compute, storage, analytics, databases, IOT and many more. These services can be combined to create scalable and practical cloud-based applications. Today, we will integrate Salesforce with AWS using one of its services called Amazon Connect.

Salesforce Amazon Integration
Amazon connect can be described as an omnichannel cloud contact center, with the help of Salesforce AWS Integration you can create personalized experiences for your customers using the omnichannel communication, Salesforce AWS Integration lets you create dynamic chat and voice support based on customer preferences and estimated wait time, Amazon connect is basically an adapter which provides browser-based contact control panel (CCP) functionalities within the Salesforce environment, the Amazon connect CTI integration consist of two components:
- A managed Salesforce package.
- An AWS Serverless application deployed to your AWS environment.

The managed package is the base of CTI integration between Salesforce and Amazon Connect, while the server less application along with the core CTI integration provides access to additional functionalities and tools that provide access and analyses of data from both platforms, these components can be used to build a deep integration between Amazon Connect and Salesforce, the server less application also contains Lambda functions which can be used by Amazon Connect to interact with Salesforce.
Salesforce Amazon Connect CTI Benefits
The Key benefits of Amazon Connect CTI are as follows:
- Amazon connect CTI voice and chat support: It enables user to make voice and chat calls from within the Salesforce environment, the user can directly call a contact from the contact record screen, it helps in removing manual steps for that a user needs to take while connecting with a customer.
- Single Sign-On support: Single Sign-on allows user to log in with a single ID and password to of several related, yet independent web portals ,the Salesforce AWS Integration provides seamless login with connect and Salesforce with any standard SAML 2.0 provider.
- IVR data dips: Ability to inject Salesforce data into customer experience, this helps businesses to offer personalized greetings and dynamic routing based on customers personalized interest and information, the data dips can help to route calls based on the users preferences.
- Call logging and recording: Call interactions are logged as Salesforce activities and the recordings from the Amazon connect environment can be played in Salesforce environment locally, with the help of this feature the user can manage all the data at a single source.
- Contact historical reports: Ability to display historical contact reports from Amazon connect within Salesforce, this can help in tracking the previous communications with customers.
- Contact centre real-time reports:
Ability to display real-time contact reports from Amazon connect within Salesforce, this particular service can help Real time monitoring of calls and can used to quickly and easily identify customer at risk. - Lightning CCP extensions: This helps in easy customizations and extend behaviours within the CTI Adapter such and screen pop and activity management.
Salesforce AWS Integration Steps
Now, let’s dive into the integration steps:
- Create an AWS account, you can use this link to open the AWS signup page, you can also use your existing account if you already have one, while setting up the AWS account please follow the below mentioned steps :
- Select the region where you intend to use the application.
- Follow the below mentioned steps to create an Instance –
- Provide the access URL name.
- Provide the access URL name.
- Add admin user (Optional).
- Check both the Incoming calls and outbound calls checkboxes.
- Review the provided details and create the instance (The process can take a few minutes, once complete, claim the contact number, the contact number can be customized) see the attached image 2.2 Manage Phone Numbers.

- Enable Mydomain in your Salesforce org (Please ignore is already active).
- 03. Install the Amazon connect CTI from Salesforce AppExchange, you can use this link to open the Amazon connect CTI AppExchange screen.
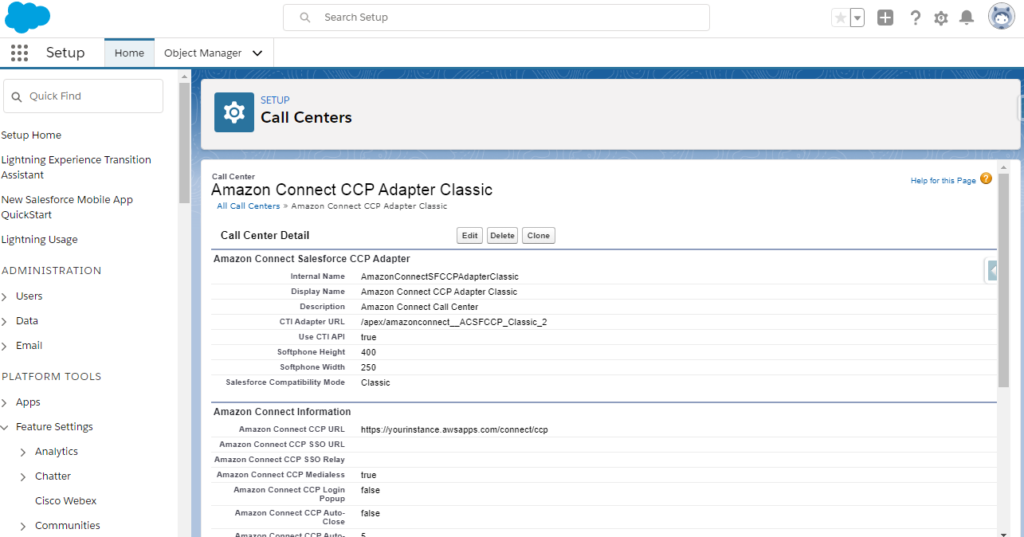
- 04. Once the installation of Amazon connect CTI is complete, go to Setup and enter “Call center” in the quick find box, select the Call Centers option (If the package we installed earlier is installed successfully, you will be able to see ‘Amazon connect CCP adapter’ option’s here).
- 05. As we are targeting Salesforce classic environment in this tutorial, let’s edit the Amazon Connect CCP Adapter Classic option, so that we can make use of it for making soft calls –
- Change the CTI Adapter URL to ‘amazonconnect__ACSFCCP_Classic’.
- Change the Salesforce Compatibility Mode to ‘Classic’.
- Change the Amazon Connect CCP URL to –
- https://example.awsapps.com/connect/ccp (here replace ‘ example ‘ with your Amazon connect instance name).
- Now, let’s add Country code, name and phone number details to the Phone number formatting field, ex- {“OPF”:”0″,”NPF”:”1″,”Country”:”US”,”NF”:”International_plaintext”,”TNF”:”(555) 123-4567″}
- Lastly, lets add a call center user by using the ‘Manage Call Center Users’ option (Add at least one user) . See the Figure 2.3 Call Center Amazon Connect CCP Adapter setting
- Now, let’s search for Visualforce Pages using the quick find box-

- Open ‘amazonconnect__ACSFCCP_Classic’ page and preview it. See the figure 2.4 List of VF pages after installation
- Copy the URL, ex: if the URL is – mydomain-visual.force.com/apex/ACSFCCP_Classic
Then copy the Mydomain url only – mydomain-visual.force.com/
We will set this URL on the Amazon Connect to console. - Now, let’s move to the Amazon Connect console and select the Service console option, once inside service console, open Amazon Connect and select the Instance you created earlier.
- Once inside the Instance settings, select the ‘Application Integration’ option and add origin (The URL we copied earlier), ex – mydomain-visual.force.com/.
See Figure 2.5.1 Instance Setting.
- Now, let’s select the Overview in instance option and log in as an administrator, this will open up a new window with users option on the left, Click the user management option and fill the following details-
- First name, Last name, username, password, and other personal details.
- Routing profile: Basic routing profile.
- Security profile: Agent (Only and must).
- Phone type: Soft phone.
- Once you complete all the above-mentioned steps, click on the login URL (EX: yourloginurl.awsapps.com/connect/login), let’s select the Overview in instance option and log in as an administrator, this will open up a new window with users option on the left, click the user management option and fill the following details.
Call recordings
Once you complete a call using the Amazon Connect service, the AWS server stores your recordings in the S3 bucket (this only works if you have enabled the storage service with Amazon Connect and call encryption must be active) , you can retrieve the call recordings from AWS server and play them locally in Salesforce by using the below-mentioned steps:
Steps at AWS server
- To retrieve the call recordings, you need to write a Lambda function and add it to the Contact flow on the AWS server. You can find attached code file for contact flow Code File: 3.1 Sample_recording_behavior, which you directly import. Basically, the lambda function works as a fallback handler; once the call gets completed, the lambda function passes the necessary details to the Salesforce environment, with the help of which the user can retrieve the recordings when needed:

- Write an API in Salesforce, the lambda function from the AWS server will hit this API and return the contact id and mobile number, the API class will store the contact id and mobile number in a custom call recording details object and will attach this custom object to the concerned Account record.
- See the Figure 3.1 Lambda function code and Code File: 3.2 LambdaFunction
Code: CallRecordingDetailsAPI
@RestResource(urlMapping='/v1/AWSCallRecordingDetails/*')
global class CallRecordingDetailsAPI {

    global class ResponseWrapper{
        public Integer StatusCode;
        public String StatusMessage;
    }

    @HttpPost
    global static ResponseWrapper doPost() {
        ResponseWrapper resp = new ResponseWrapper();
        RestRequest req = RestContext.request;
        Transient String requestBody = req.requestBody.toString();
        Transient Object untypedJson;
        untypedJson = JSON.deserializeUntyped(requestBody);
        Transient Map  root = (Map ) untypedJson;
        String ContactId = (String)root.get('ContactId');
        String ContactNumber = (String)root.get('ContactNumber');
        System.debug('ContactId: '+ContactId);
        System.debug('ContactNumber: '+ContactNumber);
        if(ContactId != '' && ContactNumber != '' )
        {
            if(ContactNumber.contains('+91'))
            {
                ContactNumber = ContactNumber.replace('+91','');
                System.debug('ContactNumber:+91 '+ContactNumber);

            }
            else if(ContactNumber.contains('+1'))
            {
                ContactNumber = ContactNumber.replace('+1','');
                System.debug('ContactNumber:+1 '+ContactNumber);

            }
            Account acc = [select id, name from account where Phone_Number_Without_Format__c =:ContactNumber order by LastModifiedDate limit 1];
            Call_Recording_Info__c CRIObj = new Call_Recording_Info__c();
            CRIObj.Name = ContactId;
            CRIObj.Contact_Id__c = ContactId ;
            if(acc != null)
            {
                CRIObj.Account__c = acc.id;
            }
            CRIObj.Contact_Mobile_Number__c = ContactNumber;
            insert CRIObj;
        }
        try{
            //insert objld;
            resp.StatusCode = 200;
            resp.StatusMessage = 'Created Record Successfully';
        }catch(Exception e){
            resp.StatusCode = 257;
            resp.statusMessage = 'Exception : ' + e.getMessage();
            System.debug('Exception: '+e);
        }
        return resp;
    }

}- With the contact id and mobile number we got from the AWS server, hit the AWS S3 bucket API, the API will return the recording filename, we will merge this filename with the base URL to retrieve the recent recording.
Code: GetFileURLFromS3UsingPrefix_Controller
public class GetFileURLFromS3UsingPrefix_Controller
{
    public String prefixName {get;set;}
    public String createdDt {get;set;}
    public String recordId {get;set;}
    public String BucketName = '';
    public String AccessKey  = '';
    public String SecretKey  = '';
    public String filePath = '';
    public String datePath = '';
    public String requiredCallRecordingFileNamewithPath = '';
    public String accessURL {get;set;}
    public ApexPages.StandardController controller {get; set;}
    public Call_AWS__c CRI;

    public GetFileURLFromS3UsingPrefix_Controller(ApexPages.StandardController controller)
    {
        CRI = new Call_AWS__c();
        this.controller = controller;
        this.CRI = (Call_AWS__c)controller.getRecord();
    }
    public void doInit()
    {
        Call_AWS__c CRI_Obj = [Select id, name, CreatedDate, Access_URL__c, Account__c, Contact_ID__c, Customer_Endpoint__c, File_Name__c from Call_AWS__c where id =:CRI.Id limit 1];
        prefixName = CRI_Obj.Contact_ID__c;
        prefixName = prefixName.trim();
        System.debug('prefixName : '+prefixName);
        createdDt = CRI_Obj.CreatedDate.formatGmt('YYYYMMdd') +'';
        //createdDt =  createdDt.split(' ')[0];
        recordId = CRI_Obj.id;

        BucketName = 'connect-e6578bc6434c';//YOUR Bucket Name  connect-be31fe0c625e/connect/CallRecordings
        AccessKey  = 'AKIAJnjjhujuhu';//YOUR S3 Access Key;
        SecretKey  = 'aeCTxgrZ/5rsNunCce35ROEbHVsEJhHiijiiii';//YOUR S3 Secret Key;
        filePath = 'connect/lifeinsurancedirect/CallRecordings/';
        datePath = getDatePathName(createdDt);//        2018/07/24/
        requiredCallRecordingFileNamewithPath = getFileNameFromS3();
        System.debug('requiredCallRecordingFileNamewithPath : '+requiredCallRecordingFileNamewithPath);
        requiredCallRecordingFileNamewithPath = requiredCallRecordingFileNamewithPath.trim();
        accessURL = getAccessURL();
        updateRecord();
    }

    public String getAccessURL()
    {
        BucketName = 'connect-5454fe5df';//YOUR Bucket Name  connect-5454fe5df/connect/CallRecordings
        AccessKey  = 'AKIAJHH2M2KUTSDS';//YOUR S3 Access Key;
        SecretKey  = 'aeCTxgrZ/5rsNunCce44545sd';//YOUR S3 Secret Key;
        String file = requiredCallRecordingFileNamewithPath;//'connect/lifeinsurancedirect/CallRecordings/2018/12/06/e-bad0-bc32673c6a9b_20181206T07%3A26_UTC.wav';
        String filename = EncodingUtil.urlEncode(file, 'UTF-8');


        DateTime now = System.now();
        String region = 'ap-southeast-2';
        String method = 'GET';
        Url endpoint = new Url('https://connect-e6578bc4534c.s3-ap-southeast-2.amazonaws.com/'+file);
        Map headers = new Map();
        Blob payload = null;
        Boolean presign = true;

        //defaults
        if (headers == null) headers = new Map();
        if (payload == null) payload = Blob.valueOf('');
        if (presign == null) presign = false;

        //assemble

        String termination = 'aws4_request';
        String iso8601date = now.formatGmt('YYYYMMdd');
        String iso8601time = now.formatGmt('YYYYMMdd\'T\'HHmmss\'Z\'');
        String credentialScope = iso8601date + '/' + region + '/' + 's3' + '/' + 'aws4_request';

        //prepare headers
        headers.put('Host', endpoint.getHost());
        String signedHeaders = signedHeadersFor(headers);

        //handle spaces and special characters in paths
        String spec = '';
        spec += endpoint.getProtocol() + '://';
        spec += endpoint.getHost();
        spec += rfc3986For(endpoint.getPath(), false);
        if (endpoint.getQuery() != null) spec += '?' + endpoint.getQuery();

        //prepare parameters
        PageReference pr = new PageReference(spec);
        Map parameters = pr.getParameters();
        parameters.put('X-Amz-Algorithm', 'AWS4-HMAC-SHA256');
        parameters.put('X-Amz-Credential', AccessKey + '/'+ credentialScope);
        parameters.put('X-Amz-Date', iso8601time);
        parameters.put('X-Amz-Expires', '86400');
        parameters.put('X-Amz-SignedHeaders', signedHeaders);
        //parameters.put('X-Amz-SignedHeaders', 'content-type;host;x-amz-content-sha256;x-amz-date');

        //Task 1: Create a Canonical Request for Signature Version 4
        //https://docs.aws.amazon.com/general/latest/gr/sigv4-create-canonical-request.html
        String canonicalRequest = canonicalMethodFor(method)
            + '\n' + canonicalUriFor(endpoint.toExternalForm())
            + '\n' + canonicalQueryStringFor(parameters)
            + '\n' + canonicalHeadersFor(headers)
            + '\n' + signedHeadersFor(headers)
            + '\n' + (presign ? 'UNSIGNED-PAYLOAD' : hexEncodedHashFor(payload))
            ;
        System.debug('canonicalRequest:\n'+canonicalRequest);

        //Task 2: Create a String to Sign for Signature Version 4
        //https://docs.aws.amazon.com/general/latest/gr/sigv4-create-string-to-sign.html
        String algorithm = 'AWS4-HMAC-SHA256';
        String canonicalRequestHash = hexEncodedHashFor(Blob.valueOf(canonicalRequest));
        String stringToSign = algorithm + '\n' + iso8601time + '\n' + credentialScope + '\n' + canonicalRequestHash;

        //Task 3: Calculate the AWS Signature Version 4
        //https://docs.aws.amazon.com/general/latest/gr/sigv4-calculate-signature.html
        Blob keySecret = Blob.valueOf('AWS4' + this.secretKey);
        Blob keyDate = Crypto.generateMac('hmacSHA256', Blob.valueOf(iso8601date), keySecret);
        Blob keyRegion = Crypto.generateMac('hmacSHA256', Blob.valueOf(region), keyDate);
        Blob keyService = Crypto.generateMac('hmacSHA256', Blob.valueOf('s3'), keyRegion);
        Blob keySigning = Crypto.generateMac('hmacSHA256', Blob.valueOf('aws4_request'), keyService);
        Blob blobToSign = Blob.valueOf(stringToSign);
        Blob hmac = Crypto.generateMac('hmacSHA256', blobToSign, keySigning);

        //Task 4: Add the Signing Information to the Request
        //https://docs.aws.amazon.com/general/latest/gr/sigv4-add-signature-to-request.html
        if (!presign) headers.put('X-Amz-Content-Sha256', hexEncodedHashFor(payload));
        String signature = EncodingUtil.convertToHex(hmac);
        parameters.put('X-Amz-Signature', signature);


        HttpRequest request = new HttpRequest();
        request.setMethod(method);
        request.setEndpoint(pr.getUrl());
        if (payload != Blob.valueOf('')) request.setBodyAsBlob(payload); //affects http method
        for (String header : headers.keySet()) request.setHeader(header, headers.get(header));
        Http http = new Http();
        HTTPResponse res = http.send(request);
        System.debug('res: of Access URL :'+ res);

        System.debug('request---------------: '+ request);

        String url = pr.getUrl();
        System.debug('url---------------: '+ url);
        return url;
    }
    public String hexEncodedHashFor(Blob data) {
        Blob hash = Crypto.generateDigest('SHA256', data);
        return EncodingUtil.convertToHex(hash);
    }
    public String canonicalHeadersFor(Map key2value) {

        //lowercase header keys
        Map lower2value = new Map();
        for (String key : key2value.keySet()) lower2value.put(key.toLowerCase(), key2value.get(key).trim().replaceAll('\\s+', ' '));

        //sort canonical keys by ascii code
        List sortedKeys = new List(lower2value.keySet());
        sortedKeys.sort();

        //prepare values
        List canonicalHeaders = new List();
        for (String sortedKey : sortedKeys) canonicalHeaders.add(sortedKey + ':' + lower2value.get(sortedKey) + '\n');

        return String.join(canonicalHeaders, '');
    }
    public String canonicalQueryStringFor(Map parameters)
    {

        //sort keys by ascii code
        List sortedKeys = new List(parameters.keySet());
        sortedKeys.sort();

        //prepare values
        List canonicalParameters = new List();
        for (String sortedKey : sortedKeys) canonicalParameters.add(sortedKey + '=' +
                                                                    rfc3986For(parameters.get(sortedKey), true)
                                                                   );
        return String.join(canonicalParameters, '&');
    }

    public String canonicalUriFor(String endpoint) {
        Url uri = new Url(endpoint);
        return rfc3986For(uri.getPath(), false);
    }
    public String canonicalMethodFor(String method)
    {
        return method.toUpperCase();
    }
    public String rfc3986For(String characters, Boolean encodeSlash) {
        String result = '';
        for (Integer i = 0; i = 'A' && character = 'a' && character = '0' && character <= '9') ||
                character == '_' ||
                character == '-' ||
                character == '~' ||
                character == '.'
            ) {
                result += character;
            } else if (character == '/') {
                result += encodeSlash ? '%2F' : character;
            } else {
                result += '%' + EncodingUtil.convertToHex(Blob.valueOf(character)).toUpperCase();
            }
        }

        return result;
    }
    public String signedHeadersFor(Map headers)
    {
        //lowercase header keys
        List keys = new List(headers.keySet());
        for (Integer i = 0; i < keys.size(); i++) keys.set(i, keys[i].toLowerCase());
        //sort ascii
        keys.sort();

        //prepare values
        List signedHeaders = new List();
        for (String key : keys) signedHeaders.add(key);

        return String.join(signedHeaders, ';');
    }
    public void updateRecord()
    {
        List callRecordingInfoList = [select id, name, File_Name__c from Call_AWS__c where id=:recordId limit 1];
        if(callRecordingInfoList != null)
        {
            for(Call_AWS__c CRI : callRecordingInfoList)
            {
                CRI.File_Name__c = requiredCallRecordingFileNamewithPath;
                CRI.Access_Url__c = accessURL;
            }
            update callRecordingInfoList;
        }

    }

    public String getFileNameFromS3()
    {
        Datetime now = DateTime.now();
        Datetime expireson = now.AddSeconds(60);
        Long Lexpires = expireson.getTime()/1000;

        String stringtosign = 'GET\n\n\n'+Lexpires+'\n/'+BucketName+'/';
        //System.debug('redirectToS3Key stringstosign: ' + stringtosign);

        String signingKey = EncodingUtil.base64Encode(Blob.valueOf(SecretKey));
        Blob mac = Crypto.generateMac('HMacSHA1', blob.valueof(stringtosign),blob.valueof(SecretKey));
        String signed= EncodingUtil.base64Encode(mac);
        String codedsigned = EncodingUtil.urlEncode(signed,'UTF-8');
        String url = 'http://'+BucketName+'.s3.amazonaws.com/'+'?AWSAccessKeyId='+AccessKey+
            '&Expires='+Lexpires+'&Signature='+signed+'&list-type=2&prefix='+filePath+datePath+prefixName;//      sub/test/innerFolder/th
        System.debug('getFileNameFromS3 ==URL: '+url);

        Http http = new Http();
        HttpRequest req = new HttpRequest();
        req.setEndpoint(url);
        req.setMethod('GET');
        HTTPResponse res = http.send(req);
        System.debug('res: ------------------------'+res);
        Dom.Document doc = res.getBodyDocument();
        DOM.XMLNode rootElement = doc.getRootElement();
        for(DOM.XMLNode xmlnodeobj : rootElement.getchildelements())
        {
            String temp = loadChilds(xmlnodeobj);
            if(temp != 'NotKey')
            {
                requiredCallRecordingFileNamewithPath = temp;
            }
        }
        System.debug('url: ------------------------'+url);
        //return url;
        return requiredCallRecordingFileNamewithPath;
    }
    public String loadChilds(DOM.XMLNode xmlnode)
    {
        for(Dom.XMLNode child : xmlnode.getChildElements()){

            if(child.getName() == 'Key')
            {
                //System.debug('child: '+child.getName());
                //System.debug('child: '+child.getText());
                return child.getText();
            }
            loadChilds(child);
        }
        return 'NotKey';
    }
    public String getDatePathName(String dt)//   20180720
    {
        //String dt = String.valueOfGmt(date.parse(dt1));
       /* String monthName = dt.split('-')[0]+'';
        if(monthName.length() == 1)
        {
            monthName = '0'+monthName;
        }
        System.debug('datepath : '+datepath);
        String datepath = dt.split('-')[2]+'/'+monthName+'/'+dt.split('-')[1]+'/';
        */
        String datepath = dt.substring(0, 4)+'/'+dt.substring(4, 6)+'/'+dt.substring(6, 8)+'/';
        System.debug('datepath : '+datepath);
        return datepath;
    }
}
Conclusion
With the help of Amazon Connect, the sales reps can connect with customers directly from their Salesforce org. It is life-changing as they don’t have to hold a physical phone to communicate with customers. The data is also managed at a single source (Salesforce) and can be reviewed directly. It helps in skipping a lot of manual work. As data is being managed at a single source, the chances of data blunder are also very less. I believe the Amazon Connect and Salesforce integration must be used by companies to achieve better business outcomes.
Note: while completing the integration steps, on some browsers you might face some issues like ‘Cross domain access denied’ or ‘Same origin policy’ issue, the possible solutions are –
- As some browsers because of high security parameters do not allow Cross domain transfer of data, there is no other option for the user other than changing the browser.
- Go to setup and make sure you have the following settings:
- Enable clickjack protection for customer Visualforce pages with standard headers.
- Enable clickjack protection for customer Visualforce pages with headers disabled.
References and Important links
Amazon Connect CTI introduction :
docs.aws.amazon.com/connect/latest/adminguide/what-is-amazon-connect.html
Amazon connect appexchange product :
appexchange.salesforce.com/appxListingDetail?listingId=a0N3A00000EJH4yUAH
Amazon connect guide:
docs.aws.amazon.com/connect/latest/adminguide/what-is-amazon-connect.html