-svg (3)")
Let’s have a discussion on Salesforce Deployment
Hello Salesforce Enthusiasts!!(Salesforce Developer/Consultant). This blog is about our detail discussion on Salesforce Deployment.
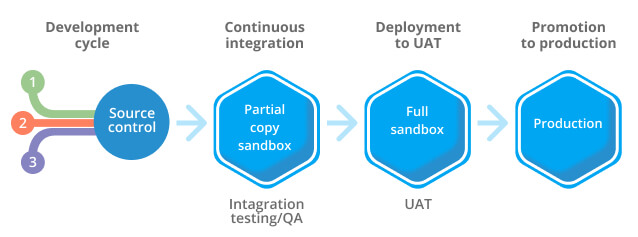
As a Salesforce Developer we know that we have at least three/four Environment for Salesforce Deployment
- Salesforce Developer Sandbox
- Salesforce Partial Copy Sandbox
- Salesforce UAT Sandbox
- Salesforce Production
Successful deployment of the changes done by developer doesn’t happen by accident. It takes time to plan the process and sometimes it takes more than one attempt to complete the Salesforce deployment successfully. However, not all deployments are successful. One of the most frustrating thing that sometimes we don’t even understand the reason of unsuccessful deployment.
I want to take a look how you can find details about your deployments, how to identify what exactly said in failure massage, go through some common deployment error messages and share some useful patterns and solutions for structuring your deployments in Salesforce. Sometimes we need to reverse the deployment just because changes are either not successful or not fulfilling your requirement.
A big successful project required lots of Deployment Activities and generally they have a separate team to handle Deployment.
Here you can see a brief about the Classical way of completing Salesforce Deployment.
There are many ways to complete deployment in Salesforce. These are ones of the most popular:
- Salesforce ChangeSet Deployment
- Salesforce IDE Deployment (IDE like Eclipse, IntelliJ Idea, ANT)
- Salesforce GitHub Deployment
- Salesforce BitBucket Deployment
- Salesforce Flosum Deployment
Salesforce Deployment Using Change Set
You should follow the next steps:
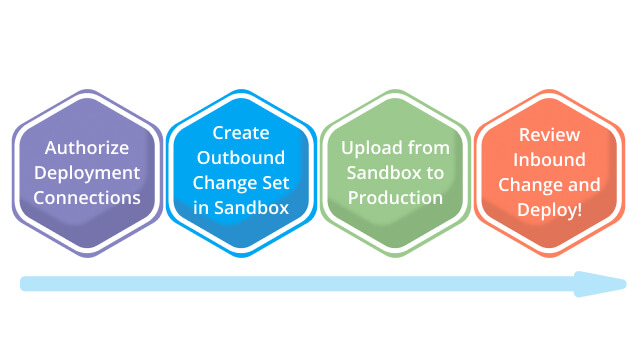
Authorize the Deployment Connection: Log into the Salesforce environment that’ll receive inbound change sets. Usually this is the production environment related with your development or QA sandbox.
From Setup, enter Deployment in the Quick Find box, and then select Deployment Settings.
Click Edit next to the organization from which you want to receive outbound change sets. Usually, this is your sandbox. Select Allow Inbound Changes set and click Save.
Lifecycle of Salesforce Deployment Flow in Change set
Create Outbound change set in Sandbox Environment: Typically, you create an outbound change set in a sandbox organization and deploy it to other sandbox depending on the development life cycle. But depending on your development lifecycle, you might choose to migrate changes in the reverse direction or between related organizations.
From Setup, enter Outbound Change Sets in the Quick Find box, and then select Outbound Change Sets. create the new change set. In the Change Set Components section, click Add and Choose the type of component (for example, Custom Object or Custom Field), the components you want to add, and click Add To ChangeSet.
Click View/Add Dependencies to see whether the components you’ve added to the change set are dependent on other customizations. Select the dependent components you want to add and click Add to Change Set. Click Upload and choose the higher or lower environment of your sandbox.
The outbound change set detail page displays a message and you get an email notification when the upload is complete.
Now log into the target organization, where you can see the inbound change set.
Validate/Review an Inbound Change Set
Validating a change set allows you to see the success or failure messages before committing the changes to the next destination sandbox. If you receive any error messages, you need to understand the error, resolve them before you deploy. The most common causes of errors are dependent components that aren’t included in the change set and Apex test failures.
Deploy an Inbound Change Set
Deploying a change set commits the changes it contains to the target organization. In the Change Sets Awaiting Deployment list, click the name of the change set you want to deploy.
A change set is deployed in a single transaction. If the deployment is unable to complete for any reason, the entire transaction will be failed and rolled back. After deployment completes successfully, all changes are committed to your environment, and the deployment can’t be rolled back.
Not everything Can Be Deployed
Change sets do not support all the Salesforce components. An administrator will thus have to perform some of the changes manually. Some components are not supported such as standard picklist values, sales processes, divisions, organization-wide email addresses, etc. Because of this limitation, an organization can face issues of:
- Increased deployment time
- Manual intervention
- The possibility of human error
How BitBucket Deployment Works in Salesforce?
Typically there are several Salesforce developers work on a single business project. It means there are many business units to handle different modules of the same project.
Like Unilever has a separate business unit to handle US Client, Asia Client and Europe Client. They all are not synced to each other. In that case, we need a common platform to discuss Business and a common platform where all the developers may deploy their changes after necessary approval from the business and Architects without affecting the other developer code.
To complete this whole requirement, we need:
- Jira and Confluence: The business tool which is generally used to discuss the User story. It works mainly based on the agile process it means we generally have a sprint to discuss the user story and develop the changes based on the business requirement.
You can use Jira to plan and track your entire User story related to the Salesforce or other integrated software development in your project. The additional software development includes front end API like Drupal, Integration API like Mulesoft and other Salesforce developed API like Marketing cloud.

Normal view of Jira App
Jira Planning:
Let‘s assume we are working on agile methodology with different defined Sprint.
- Business can create the new User Story as a Backlog in Jira, which is assigned to the developer based on developer availability in different Sprint. There are many different cycles on which user story passed through like
- User story discussion
- Development
- Assign to the Sprint
- The developer can create the subtask and handle all the technical design document of the User. Once the Technical Design Document created the Developer take the necessary approval from Architect to proceed with development
Testing Phase:
Testing can be handling using Jira. We need to create a separate task for testing and tester can create their test script there. The test script should be run and pass it in Jira.
It’s all depending on your team requirement as some Team prefers a separate tool to manage testing.
- A tester can create the issues in Jira, which is assigned to the Developer.
- Developer will fix the issue, and again the issue will be closed
Approval Phase:
Once the developer completed the development. User Acceptance testing phase was done by business to satisfy the development of Jira story.
You can track all this development in Jira.
Reporting in Jira:
A reporting is one of the most important tools in Jira. A product owner or Scrum Master uses this functionality to create a report on ongoing user story.
You can create different report based on the different requirement like:-
- Creating the report on the number of hours logged in by each developer
- Number of issues created by tester on each Sprint
- Number of backlog still left to finish
Confluence:
Confluence is basically used to track all your activities done by the developer or any other team members and work as a team. Here, team members can collaborate, share their views and share knowledge, and have technical and business discussions or any innovations and articles on new technology.

- Confluence Overview
As a Development point of view, we are going to focus mainly on Deployment using BitBucket. We are going to explain how you should successfully Deploy your changes in the different Salesforce Environment.
Lifecycle of Salesforce Deployment Using BitBucket
Imagine your developed your user story in your SFDC development sandbox or SFDX Development. One more developer is working on the same component with different requirement. You both are merging the code into common QA Sandbox without affecting the function of other developer. We can achieve this by the use of BitBucket. Not only this we can revert our changes before deployment into Salesforce production if any error happening.
The total Deployment process for Salesforce includes
- BitBucket
- Source Tree
- Beyond Compare/Win Merge
- Jenkins
Let’s have a look of each process in detail.
BitBucket Salesforce Deployment
Bitbucket is where all the component code stored you can track the changes and keep it as a back up as well if you want to revert the changes.
This is just like Github, where we store our Salesforce components.
The advantage of Git hub over Bitbucket is that it will work on configuration instead of writing command.
You can create the new branch the new branch from Source Branch to the destination branch here Source branch must be Predev branch to the Destination branch as QA branch in case of the developer.
Based on the above picture, you can check with different feature branches available based on the fixes.
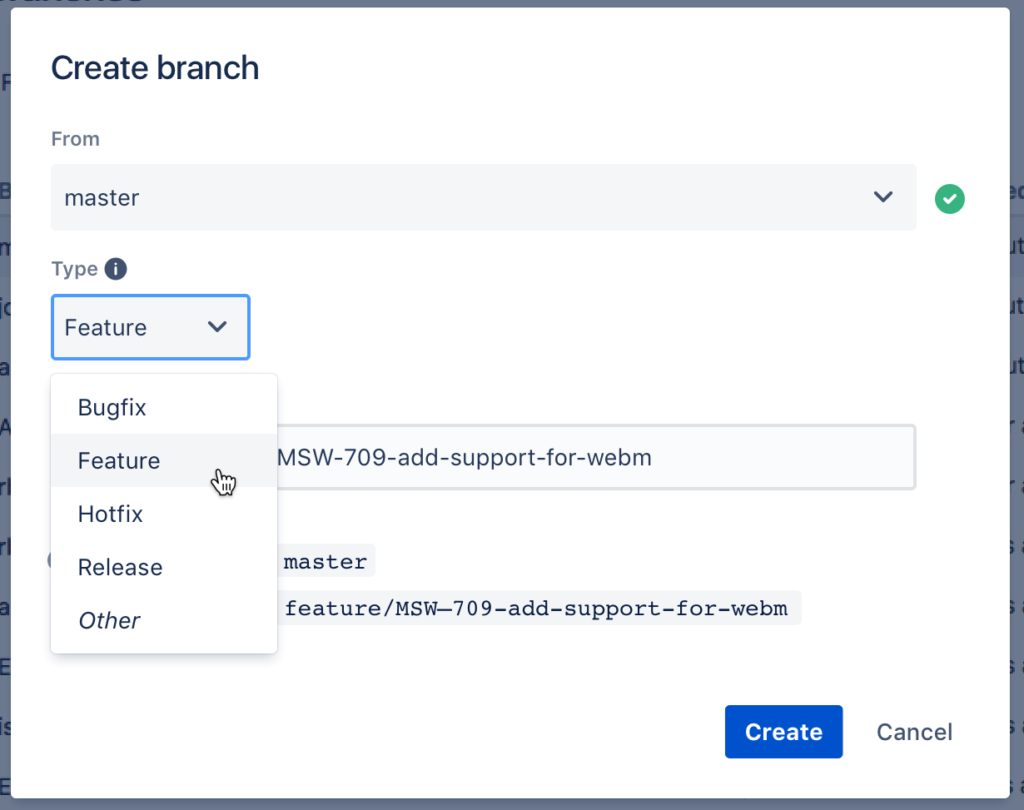
- BitBucket Branch creation
Source Tree:
Before start working on the pull request, approval process and Merging the changes to the Destination branch. Let check how we are going to commit the changes in your new feature branch.
Either you create a new Branch in source tree or Clone the Repository of Feature branch in Source Tree.

But before committing the changes to the Source tree we will face with one more issue – which are the changes of Apex code or Apex component that we are going to do in commit.
For that you can use either Beyond Compare or WinMerge to compare the changes.
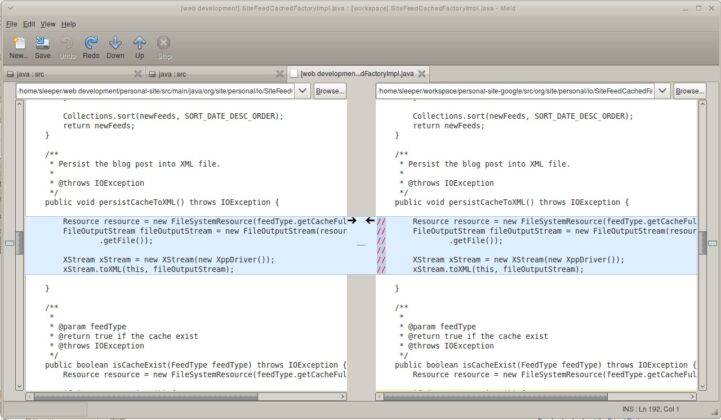
Beyond Compare:
The source tree’s file will compare with the changes file and make those changes in the destination file of the source tree and save it. The changes will reflect in the source tree.
Source Tree: Committing the changes
Once Changes are reflected in the source tree, you can commit the changes and be reflected in the Bitbucket.
BitBucket: Pull Request

Create the pull request to merge the commits done by you to the destination branch
BitBucket Salesforce Deployment: Approval Process and Merge
When you create the pull request, it should get approved by the Architect of the team or project manager before getting merge into the QA branch.
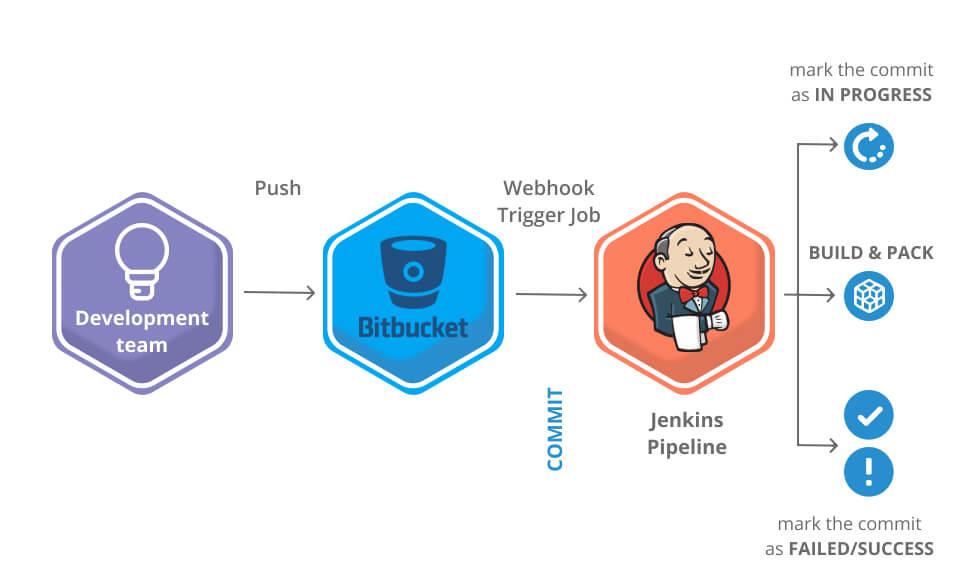
You will run the build using Jenkins, or you can run the build after making or the commits to your branch.
Jenkins optimize your code and run you, test classes, with best practices
Jenkins: Run the Build for Deployment
Login to Jenkins with your credential
Provide the URL of your Predev. Provide the name of your feature branch and run the build. You can track your deployment of Jenkins after login into your destination Org and check your deployment status as follows.
Salesforce: Deployment Status
Login to your Salesforce environment to monitor the changes done by you.
Navigate to the set up and search for Deployment status and you can monitor your deployment.